Lyra Gateway
Lyra Gateway installation tutorial
Tuto d'installation
Support :
Having trouble installing LyraGateway? Contact support : https://support.lyra-system.com/hc/fr/requests/new
Lyra Gateway installation tutorial
ANTENNA MOUNTING
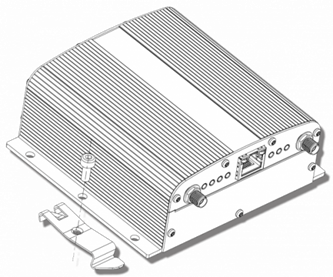
The Lyra Gateway base unit has two SMA-female antenna connectors on the front panel.
Before attaching the antennas, make sure they meet the RF specifications.It is strongly recommended to use attennas provided by Safyr.
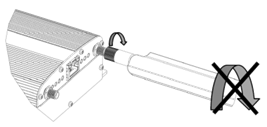
Warning for antenna assembly.
The antenna has to be assembled in such a way that only the nut is rotating onto the SMA connector. The antenna body itself may not be rotated. In this way the inner conductor of the antenna is sliding into the SMA connector without rotation. This is the best way to provide a reliable RF contact.
INSTALLATION INSTRUCTIONS
The Lyra Gateway can be mounted on a wall or DIN rail.
IMPORTANT: All mounting material, like screws, nuts, bolts and DIN rail adapters, has to be provided by the installer.
Warning in case of mounting on a metal chassis
Make sure that the chassis on which the Lyra Gateway is mounted is on the same electrical potential as the negative pole of the Lyra Gateway’s DC-supply.
As the metal shielding of the RF-cables (e.g. nuts & bolts including those of extension cables) is electrically connected to the Lyra Gateway housing, the same requirement is valid for the chassis on which these metal parts are mounted.
Neglecting this requirement will lead to excessive current draw between the chassis and the Lyra Gateway supply, which will damage the Lyra Gateway device.
Mounting on a wall
The Lyra Gateway can be mounted on a wall with six screws. The mounting holes in the base of the Lyra Gateway have a diameter of 4.3 mm. Safyr recommends using screws with a thickness of 4 mm and a minimum length of 30 mm (M4x30mm).
TIP: When choosing the mounting orientation of the unit, consider the direction of the cables and antennas. Make sure cables are routed with sufficient ease to all connectors, and that the antennas are unobstructed for easy positioning. The front panel LEDs should also be visible.
Mounting on a DIN rail
To mount the Lyra Gateway on a DIN rail, use two DIN rail adapters. These DIN rail adapters have to be fixed on the Lyra Gateway using M4 nuts and bolts of an appropriate length. Safyr recommends adaptors from the following companies:
• Phoenix Contact
• DSB Marketing
• Hammond
INFO: When using the AC adapter, the power plug can serve as a "network disconnection device". Ensure that the device connecting plug is readily accessible so that it can be pulled out easily when necessary, without having to push other devices out of the way.
GATEWAY POWER SUPPLY
Plug in the power supply into the power connector on the back side of the unit and into power source. Ensure the power supply meets the power requirements of the device. It is strongly recommended to use the power supply provided by Safyr.
Observe the LEDs on the front panel to check whether the unit starts up normally. When the power-on sequence is complete, the System and WAN LEDs on the front panel turn green.
NETWORK CONNECTION
NOTE : NOTE: By default, the gateway can be delivered with a SIM card, in this case it will be automatically connected. To enable connectivity and data synchronization with Lyra, make sure to place the Gateway in a location covered by a cellular network connection.
To connect Lyra Gateway to a local network, connect an RJ-45 cable to the gateway's LAN port and your company's network.